Optimization is a huge topic. Conversions, marketing funnels, search engine optimization… There’s a lot to consider. These ecommerce optimization tips and best practices are a good place to start.
Section 1: UX optimizations
On the technical side of things, here are a few small ecommerce optimization tips you can implement today that will start working for you tomorrow.
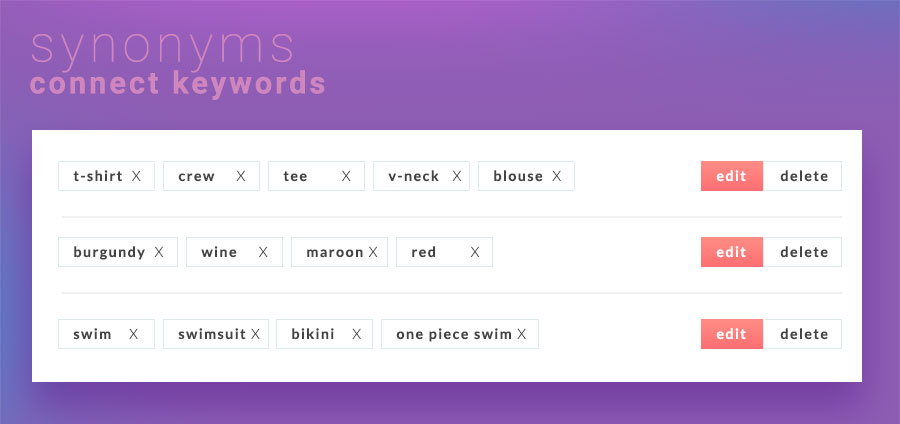
Review your synonyms & redirects
Ecommerce optimization tips to reduce “no results” and irrelevant product searches for shoppers
Tip #1 Regularly check for synonym opportunities
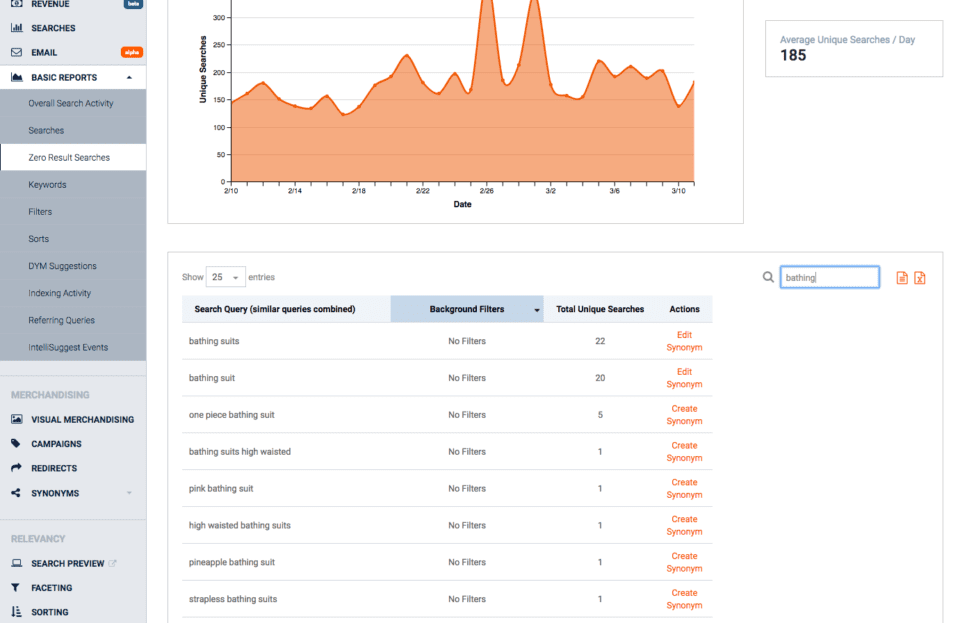
Just last week, I was doing research in the Searchspring Management console and noticed that one of our fashion retailers had DOZENS of search queries every day for the term “bathing suit”. At first, I shrugged it off thinking that they probably didn’t sell swimwear. I was wrong. In this situation, simply creating a synonym that directed users from the term “bathing suit” to their selection of swimwear would help hundreds of visitors each month.
That very same store was being bombarded with hundreds of searches for variations of the term “prom dress”. Again, the word “prom” wasn’t in their product data, so the search engine believed that this type of dress didn’t exist on their store even though they did sell formal dresses and evening gowns.
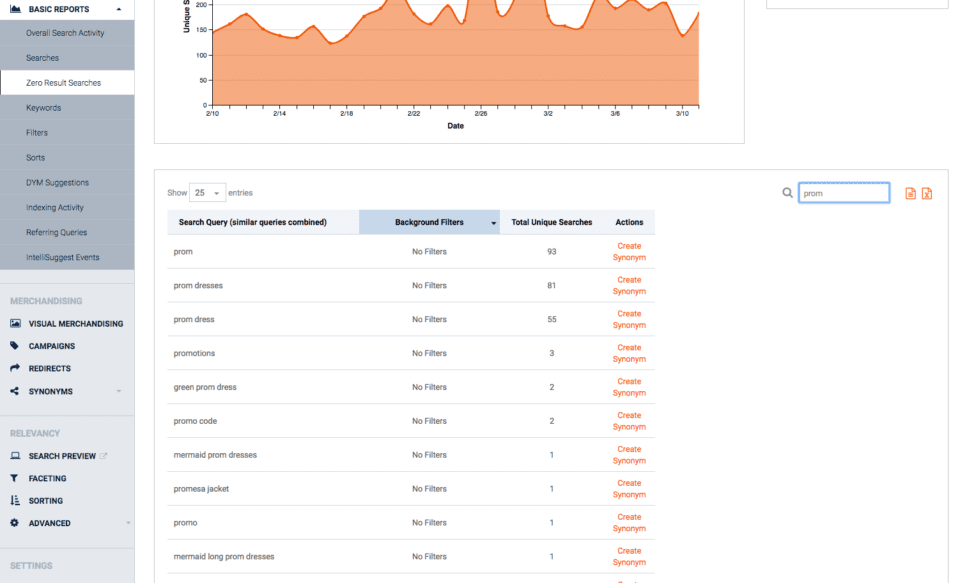
At the very least, you should be looking into the search terms of your shoppers on a seasonal basis. This especially makes sense if you’re a fashion retailer. The “prom” season, for example, is generally about three months long.
Tip #2 How to find synonym opportunities
In Searchspring, you can find searches that aren’t returning results by looking at the Zero Results Search report, or by viewing the DYM (Did You Mean) suggestions report.
In Google Analytics, navigate to Behavior > Search Terms, and sort by Search Exits (high to low). Search queries with a 85-100% exit rate probably aren’t displaying results. To be sure, copy the search term and paste it into your search bar. If there aren’t any products, you know that you need to create a synonym.
We recommend viewing results from the last 1-3 months on this report.
Tip #3 When to create a synonym
Use a synonym in these scenarios:
- When many visitors misspell the same keyword
- When many products are missing a keyword or phrase that accurately describes them
- When there are multiple words that mean the same thing and product data does not always include both (gray/grey or PJs/pajamas)
Note: Keep your use of synonyms broad & simple so that you don’t harm the relevancy of your search engine
There are times when you won’t want to create a synonym, even if searches are returning zero results. Don’t create a synonym for:
- Queries that have been used only a few times in a long period
- Queries that are vague
- Queries for brands
- Queries for categories
- Queries for content (i.e. Return Policy)
- Queries for items you do NOT carry
There are usually better solutions for these types of queries, even if users aren’t finding any products. In some of these cases, you’ll want to create a redirect instead.
Redirects are a little bit different from creating a synonym on a technical level. Rather than telling your shopping cart platform or search provider that “keyword A” is equal to “keyword B”, it just sends users to a specific URL on your store.
What’s on that URL can change, and can be highly customized.
Tip #4 When to create a redirect
Use redirects for:
- Queries for brands (sometimes)
- Queries for categories (sometimes)
- Queries for content (i.e. Return Policy)
- Queries for broad terms that render hundreds or thousands of results
For brand searches:
Retailers that sell household brands will receive a lot of search queries for those popular brands. They probably receive thousands of searches each day for the brand name.
By default, a search like that will return products from a dozen or so categories, and they’ll be in a seemingly arbitrary order. How will the user find what they want?
That really depends on how your store handles search queries in general. If you are able to display relevant facet groups, which in this case might be gender, category (apparel, shoes, gear…), sub-category (running, walking, basketball, etc.), color, and price, you may not want to do a redirect.
However, if your shoppers are just seeing a random assortment of products without the ability to sort and filter, they’re going to have a problem finding what they want.
In this case, a better solution is to create a customized landing page for that brand which will help the user find the product category they need.
For category searches:
Similar ecommerce optimization tips can be applied for broad category searches like “shoes”. Analyzing user behaviors on client sites, we’ve found that most users who search for these broad categories are expecting to be able to narrow their results using filters. So a user might search for “shoes” expecting to see filters for “women’s”, “athletic”, and “price $50-$75”.
Historically, there’s more chance that they’ll have success with a broad search than an extremely detailed one like “50-75 dollar women’s athletic shoes”.
While many users will choose to filter down their results (assuming you have appropriate facets in place), it might be better to anticipate their needs and create a relevant experience for them.
Most popular sub-categories are prominently displayed with large images just below a banner for their new arrivals in this department.
For content searches:
Searches for content pages (Return Policy, Contact Us, etc.) may not be your most popular queries, but that doesn’t mean they’re not important.
Redirects are a perfect solution if your search engine is only configured to search for products.
Want to learn more? Check out our ultimate ecommerce site search guide.
Fully utilize user-generated content
Ecommerce optimization tips to reduce returns, increase traffic, increase conversion rates, and improve the shopping experience for your customers by utilizing UGC
Tip #1 Allow visual content in ratings & reviews
Allowing users to post both photos and videos within their reviews, and Q&A sections will provide better content for shoppers.
Tip #2 Curate and consolidate UGC into product pages
User-generated content often provides useful information and unique perspectives of buyers. When you detect themes in reviews and Q&As, don’t be afraid to consolidate all of the most important findings into the product description area, making it even easier for shoppers to find the information they need. For example, if many customers are reporting that a particular brand of shoes runs a size large, include that information in the product description.
Tip #3 Make UGC searchable
Allowing your users to search through user-generated content will help them find answers about product compatibility and reliability much faster.
Tip #4 Allow users to sort and filter UGC
Allowing your users to sort and filter through ratings and reviews can help them determine if the product is the right fit for them or not.
Navigation optimizations
Ecommerce optimization tips to increase conversions by showing your shoppers relevant products and information
Tip #1 Optimize your no results pages
Despite your best efforts, some shoppers will land on a “no results” page. Don’t leave them on an empty page. Instead, show them something that will help them navigate to the set of products they want. Show them one or more of the following:
- Your most popular items
- Items similar to what they searched for
- Broad navigation shortcuts (Tops, bottoms, dresses, shoes, etc.)
- A search box
Stores that do this see consistently higher conversion rates by assisting their shoppers.
Tip #2 Display product options clearly
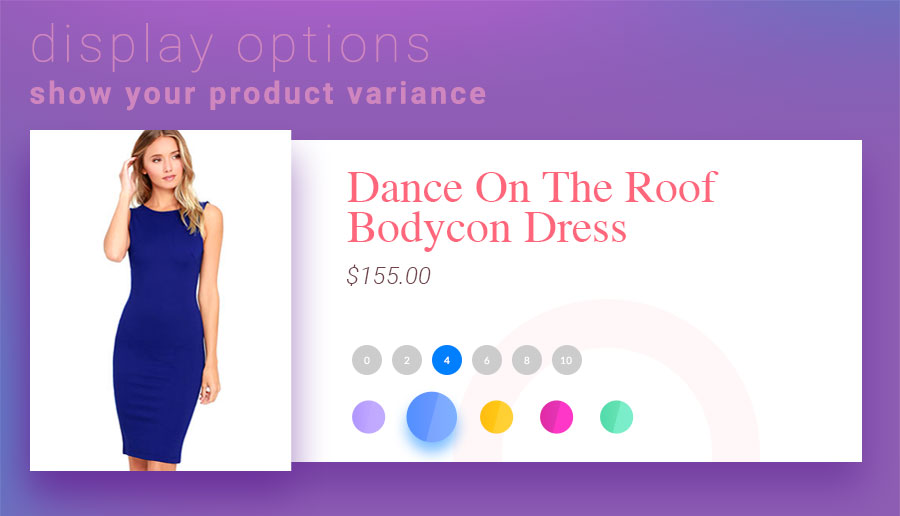
Once on a product page, ensure that it’s clear what options a shopper has to choose from. Size, color, storage amount, fitment, etc., should all be clear and easy to select from. This can be done with buttons or a series of drop-down selection tools.
Tip #3 Put reviews front-and-center on the product page
Consumers don’t like wasting their money and would prefer not to have to try multiple items before finding one that works for them. Don’t make your users scroll through lengthy product descriptions before being able to see review scores, and review content.
Tip #4 Show the sale price and MSRP
No list of ecommerce optimization tips is complete with a reminder to highlight discounts. If you have products on sale, or other fancy pricing logic with your store, be sure to leverage this data and display it for the user. If a product is on sale, show the sale price and the msrp price. Show the shopper the savings they’re getting right upfront. Seeing a shirt on sale for $19.99 isn’t very motivating. Seeing that same shirt on sale for $19.99 when it’s originally $39.99, now that’s saying something – like, this product is 50% off!
Tip #5 Use pagination
No one wants to scroll through hundreds and thousands of products, click on a product, click the back button, and have to start all the way over.
Use pagination. Make it easy for your shoppers. They need the ability to quickly find and re-find the same product.
Tip #6 Include a products-per-page option
Let shoppers chose how many products per page they see. Some like just a few products per page with deep pagination. Others like to take a quick scroll to see if your store has what they want – before sitting through several full-page reloads.
Cater to both. And, word to the wise, make sure your product per page amounts are equally divisible by how many products per row are displayed. Having a widow product on row 6 gives the shopper the impression they’re at the end of the product results – they miss the fact there are 3 more pages.
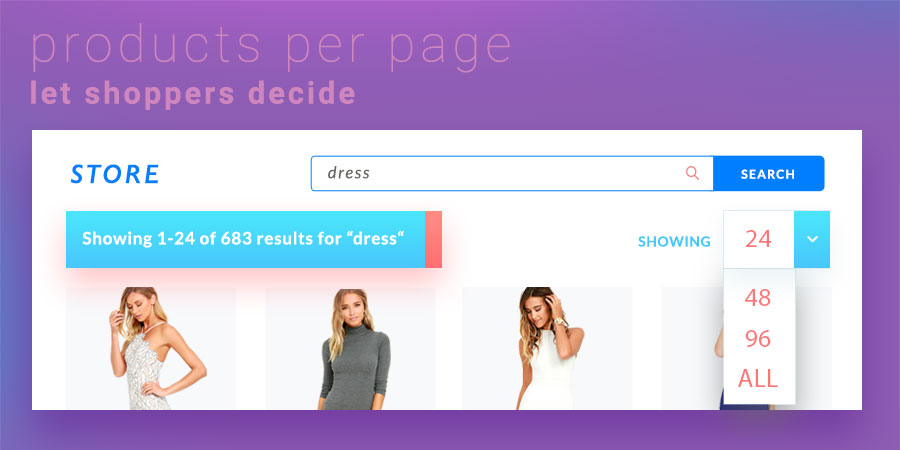
Some shoppers like paginating, others want to see everything on the same page. Let your shoppers choose how many products per page they can view.
Tip #7 Display low-stock count
You should take advantage of any social trigger and psychological trick that you can. Including your stock count, when you can ensure its accuracy, is a gold mine of an opportunity.
Shoppers are susceptible to this tactic. It’s called FOMO – the fear of missing out.
I didn’t write the rules, I don’t pretend to even fully understand them, but it’s a demonstrated fact when you engage with the psychological principle of urgency and exclusivity, you’re on the right track. Include low-volume stock counts to boost your conversions. As ecommerce optimization tips go, it’s a no-brainer.
Tip #8 Display the number of matching results
Fantastic, your search bar didn’t deliver zero results, but how many results did it actually deliver?
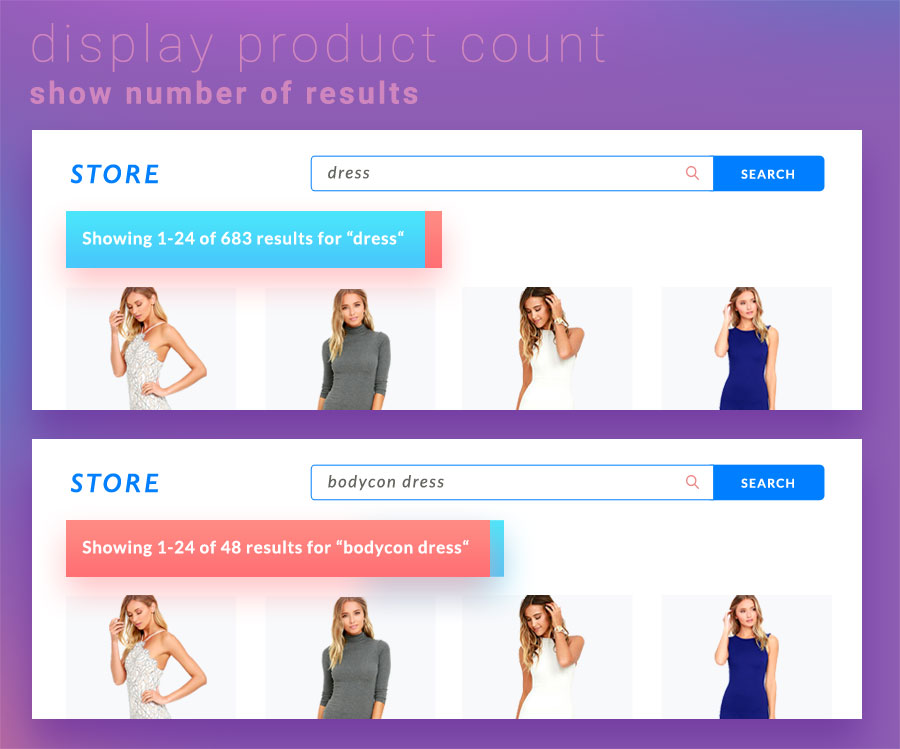
Display the number of products for the shopper’s search query. Let them know if their search was too broad, too narrow, or just right.
Shoppers who search are motivated, but that motivation can be a double-edged sword if you leave them in the dark.
Did their search query generate hundreds of results or only a handful? Displaying the number of results helps the shopper know if their search query was too broad, too narrow, or just right.
Don’t leave your shopper’s in the dark. Let them know if their search phrase was actually good or not.
Tip #9 Include a “buy now” button on your product results pages
Shoppers who search are your motivated buyers. On average, shoppers who search convert 5-6 times more than those who don’t. Add a “buy now” or “add to cart” button directly to each product in the product results display.
Section 2: Ecommerce optimization tips for product images
Product images are one of the most important pieces of content on your site. You could almost get away without marketing copy beyond the item’s name, but shoppers will not click on an item without an image.
Technical tips to improve your images
Ecommerce optimization tips to increase the quality of your images to make them more compelling
Tip #1 Create consistent, appealing product images
Make the shopper understand what it might feel like to hold and use the product with usage shots, close-ups, and photo-detailed benefits. Use images to bring out the strengths of the product in relation to how well it will please the shopper.
Tip #2 Reduce noise
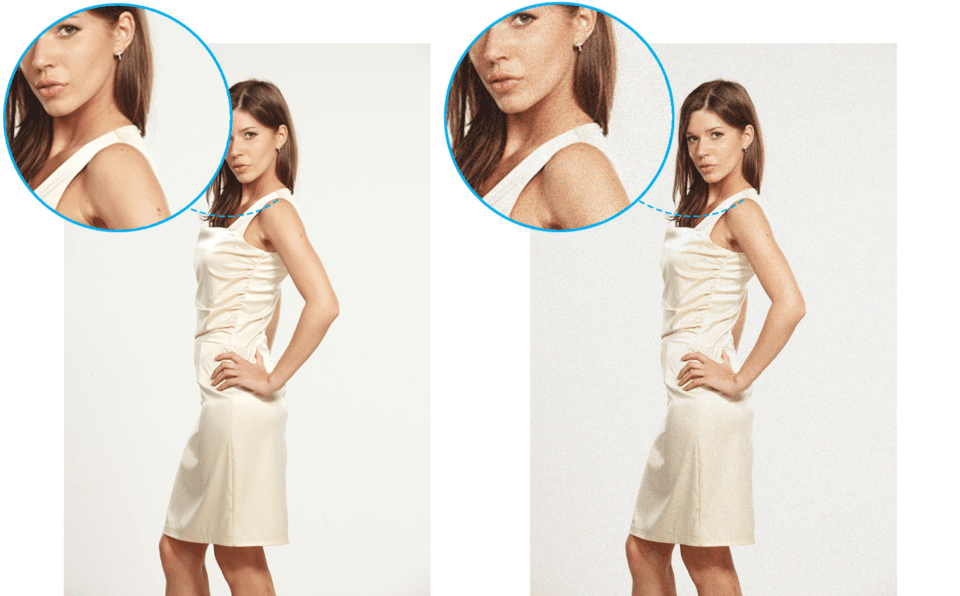
Having graininess in your image usually results from having ISO set too high. ISO artificially brightens an image digitally.
If you need to turn ISO up to brighten the images, that means that either there’s not enough light, or you need to let more light onto the sensor.
To increase the amount of light hitting the camera’s sensor, use a tripod and increase aperture or exposure time, or increase the amount of light in the environment.
Tip #3 Properly white-balance your images

White balance aims to make images look “correct” by altering the white point.
Ensuring that white balance is set properly is crucial in order to ensure that all of your images look the same, and that your white background matches the other white elements on your website.
Tip #4 Use simple backgrounds

The focus has to be on the product.
In lifestyle images, using shallow depth of field With the background blurred enough, many backgrounds can become a lot less distracting, and help to pull the eye toward the model and the products.
Tip #5 Provide at least 3 images
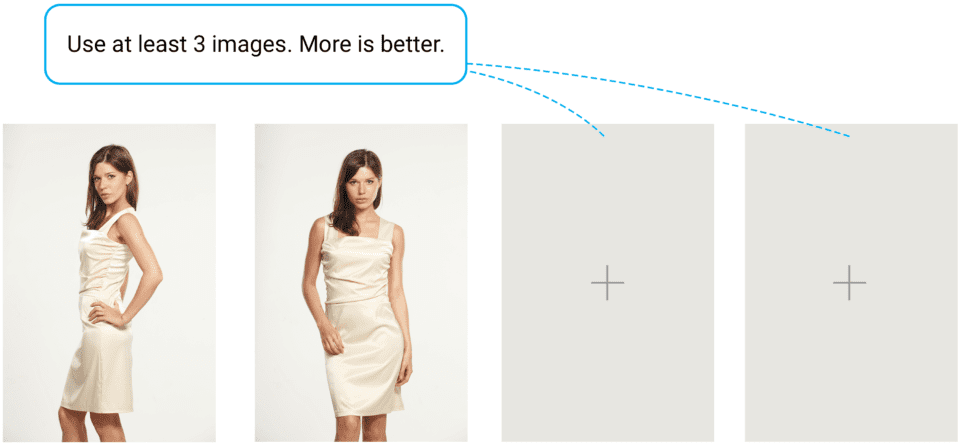
At the very least, you should have 3 images; front, 90 degree side view, and rear view. This is the bare minimum, though, and more is better. Most platforms will allow you to have 10 or more images. Take advantage of this.
Most sites will allow shoppers to click on an image, or hover over it, to see a zoomed in view. Even if your site supports this, it’s usually helpful to provide zoomed images of important features or areas. If you sell a fashion product with lace, for example, providing a close-up shot of that area will help shoppers see the pattern and determine if it fits their style or not.
Tip #6 Use dynamic images
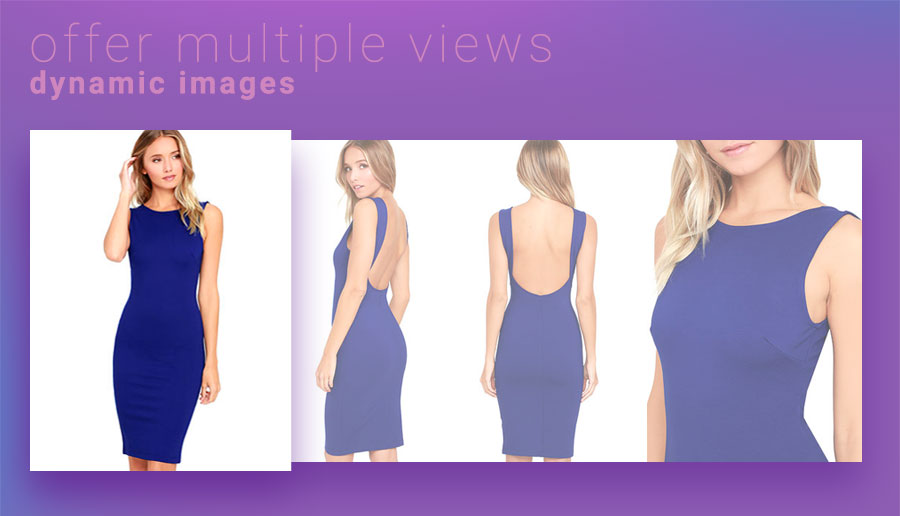
In addition to displaying that you have a product variance, allowing the shopper to see those product variances from the results page is even better.
For example, if you have a dress that comes in several colors, allow the user to click or hover over the swatches and have the image change to match.
Don’t have any product variance, then take advantage of dynamic images and show an alternate view.
For example, if your dresses only come in one color, let the shopper see the back view when the they hover over the thumbnail.
Fashion product image tips: Flat-lay, mannequin, or models?
Tip #1 When to use flat-lay photography
Flat-lay (or lay-flat) photography can actually be quite compelling. While most second-hand clothing sales use photographs like these that are quite unattractive (think eBay clothing stores), there is a way to do this properly.
This is by far the easiest (relatively speaking), and cheapest way. You’ll need only a background (table), studio lights, and a rig for your camera. Once you understand how to get this set up, breaking down and setting up the studio quickly will become relatively easy. Changing a backdrop is as simple as moving to another table, or laying down a new backdrop. This is great because it means you don’t even need to have mounting equipment for the backdrop or the clothes.
The clothing can also be styled in a lot of different ways when laying flat on a table. Some high-profile fashion retailers, such as TrunkClub use this type of photography to great effect.
Pairing the item with other items of clothing that are complimentary can help show off the product in a way that is visually appealing and can help to cross-sell other products.

Tip #2 When to use mannequins
Mannequins make it easier to show the shape of the garment as it would appear on the shopper.

Once you have your studio set up, you don’t have to worry about positioning, posing, or lighting the subject since it will be stationary and formatted.
Compared to models, mannequins can also help you establish a consistent brand aesthetic. Models may come and go, making it harder to maintain the look that your store wants as you may have to look for new models every few months. Models will also require makeup artists and hair stylists. Hair and makeup may even have to be done multiple times in a shooting session for different clothing items.
Some ecommerce sellers even argue that models are inferior to mannequins because they might make it harder for the shopper to picture themselves in the clothing. Some shoppers may even feel distaste for an item of clothing due to a subliminal or unconscious association with the model and something negative in their life. If the model is exceptionally thin, for example, some shoppers may find that unappealing. In fact, there are a lot of people who resent models in general.
Tip #3 When to use models
Models can pose and position your products in interesting and flattering ways that help the product look it’s best. It’s also (obviously) easier for shoppers to see what the product looks like on a real person, perhaps even one with a similar body shape. Models bring character and life to the garments, a sort of X factor that just can’t be achieved without one.
Models also enable you to pair multiple products together in an ensemble. This helps all of the products look more flattering, and can create cross-sell and up-sell opportunities.
Of course, using multiple styles is also great if it’s possible to do so. This would give you the opportunity to see which images gained traction so that you can double down on those.